
|
Soooooo…… I have big news. I don’t want to ramble on and turn this into a 92 page mini-novel, though I easily could. I’ll try to make this brief.
I’m leaving the bakery. Yikes. I said it. It’s bittersweet. It’s sad and scary but I think it’s best for my business. I know you’re wondering WHY. No worries….Sugar Dot is going strong. Stronger than ever actually – just in a different way. Let’s go back to the beginning for a moment..... My cookie business began in 2013. At that time in Maryland, there were no real cottage food laws, so I worked out of a local bakery in Middletown. After four years, my lovely landlord left, so I had to find a new kitchen. I thankfully found Piece O’ Cake in Frederick and have been working my business from there for the past four years. Boy, was I fortunate to find two kitchens to work out of – that helped me grow my business and were an absolute PLEASURE. I adore the women who took me in and that I have worked with over the years. I made custom cookie orders, taught classes and held cookie parties. In 2015, I taught at Cookie Con in Salt Lake City about the business of cookies. Since then I’ve worked to support other cookie decorators – with ebooks, online classes, private consults, and offering some supplies. I LOVE helping other cookiers start and grow their businesses. I also LOVE teaching people to decorate cookies! These two areas of my business grew to the point that I stopped taking custom cookie orders in late 2019. I was happy to focus on those other areas. I was glad to stop taking customs for another reason….. It felt strange to me to be “competing” with local cookie decorators that I wanted to SUPPORT. Leaving the cookie decorating to them feels RIGHT. I was teaching several classes and hosting parties in different venues every week in 2019. My parties were anywhere from 20 to 120 people attending! I was living the cookie dream! Then Covid. March, 2020. All parties cancelled. All classes cancelled. Hmmmmm. Time to focus on that supply shop, my cookie business ebooks, consults, and my cookie business online classes - mostly from my home. I did bring back private one-on-one decorating classes at the bakery after a short time and those have been going strong ever since. Supporting other cookie decorators has been my true focus now for exactly one year. And guess what? I’m busier than ever! The bottom line is looking better than ever. My supply shop has grown immensely. I’m meeting cookiers online to talk about their cookie businesses. I’m helping OTHERS with THEIR businesses and just LOVING it. I am so blessed. So many businesses went under last year. I was worried for mine. I’m so thankful that my business is going strong and growing. For a while now, I’ve wondered if I should leave the bakery. Would it make better business sense to stop those decorating classes (the only thing I was actually doing AT the bakery in 2020)? I was teaching one per week on average. So I would leave my work at home on the supply shop to get to the bakery to prep for and teach that one class per week, then hurry back home to get those orders packed up and out the door in a timely manner. Hmmmmm. It was a tough decision, but I think one that is best for my business, me, and my family. I am sure going to miss those girls at the bakery. I am sure going to miss teaching in-person cookie decorating. But I do enjoy all of this other stuff too. I am beyond blessed. I am so thankful. If you’re a cookie decorator, I hope you’ll let me support you in some way. I will definitely be seeing you around online! You can shop supplies here. Ebooks here. More info on those private consults here! And there’s always my facebook group – “Cookies as Business with Sugar Dot”. We’re having tons of Facebook Live classes on a variety of topics with a variety of teachers! Be sure to stay in touch on Instagram. I didn’t write 92 pages! I’ll close here. Thank you for reading. Thank you for supporting me. Much love. Dotty
0 Comments
Join me and thousands of other professional cookie decorators as we gather in the “back room” to ask questions, encourage, support, applaud, and lend shoulders to cry on. If you are in the cookie business or planning to be, I’d love to have you! (This isn't a group about teaching decorating. It's about the *business* of cookies. You should already know how to decorate well enough to start a business or already be in the business.) If you aren't a member, be sure to answer ALL questions when requesting membership. If you don't, I won't see your request. If you answer "no" to the first question, I scroll right on by without approving it. (I'm trying to keep out the spammers, weirdos, and "sugar daddy" requests. Ha ha. Show me that you aren't a weirdo and that you ARE a cookie pro or will be soon - when you apply!) If you've applied before but haven't been accepted, message me. I probably missed your request so it’s sitting in limbo with MANY others that I don’t have the heart to reject. Click here to get to the group and request permission to join. Be sure to read ALL the group rules first. Hope to see you there! 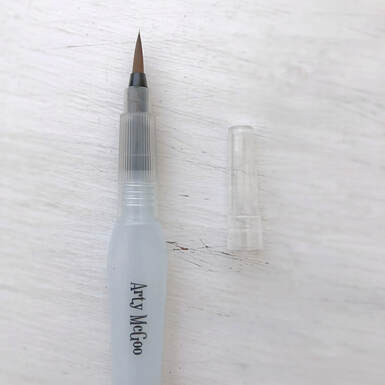
I'm thrilled to now be carrying Arty McGoo's Water Brush in my online cookie supply shop!
You do know Liz Adams, Arty McGoo, right? If not, and you decorate cookies, you SHOULD! Just fill, squeeze the pen to load the bristles, and you’re off, easily adding hand lettering and painting to your cookies and sweets! The brush type is round and comes in a medium size, which Arty finds the easiest to control, yet still has a very fine tip for little details. It’s also great to use for creating wafer paper flowers. They are so versatile you might want to get several brushes to keep loaded! Fill with:
Use it empty. Dip the brush into water or alcohol, then paint. Or use it empty for brushed embroidery! If filled, store horizontally when not in use. Not for use with white or metallic food colorings as they will clog the pen. Watch Liz demonstrate this amazing tool in the video below.......
Please check out all Decorating Supplies, Cutters and Gift Items in the Shop.
I'd like to share with you my #1 tip for making royal icing transfers. The biggest problem with transfers is how fragile they are. You'll always need to make extras - just in case. Some transfers are more fragile than others. Shapes with narrow areas are the most fragile. I have a tip that will make them a little sturdier. Notice the stems on these pumpkins in the photo below. That column of three on the right? Those are going to be some very fragile stems that are very likely to snap off. See all of the other pumpkin stems? Those will be less likely to snap off. Do you see why? Notice how the stems to the left are brought IN to the centers of the pumpkins. 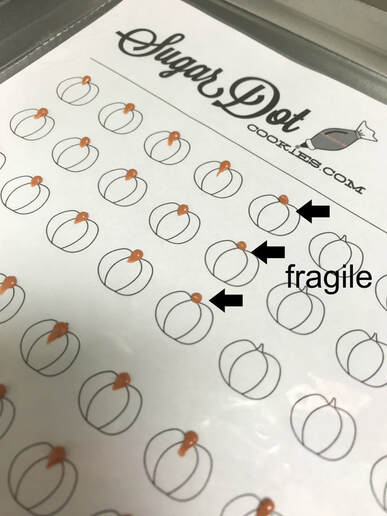 Watch this quick video clip below to see how it's done. Swipe the icing INTO the center. Swipe. Swipe. Swipe. Not: Dot. Dot. Dot. The orange icing is piped on top of part of the stems - making them less fragile. Use this tip anytime you are making multi-sectional transfers. Swipe. Swipe. 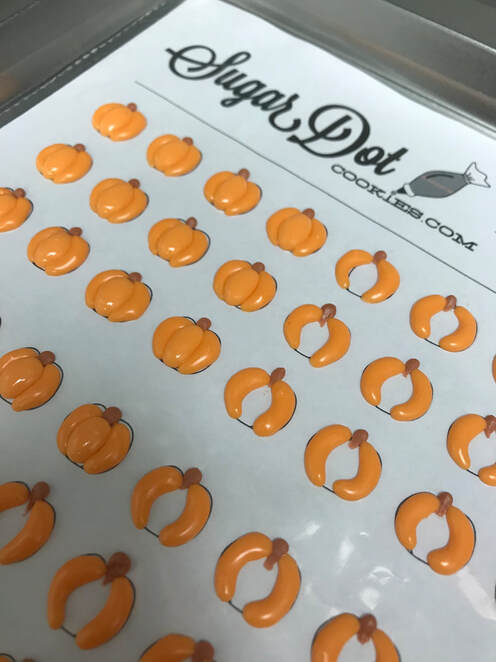  The wings on these bees? Same concept. I swiped them into the body of the bee. 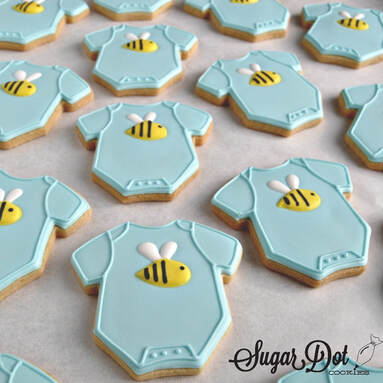 Sugar Dot Royal Icing Transfer Sheets - click here to purchase. Royal icing transfers are little candies used as decorative elements on cookies, cakes, and cupcakes. Royal icing is piped onto a design transfer sheet that acts as a template. The shapes or "transfers" are allowed to dry overnight before being peeled off the backing. They can then be dropped onto a freshly flooded cookie or "glued" onto a dry base with more icing. Royal icing transfers can be stored indefinitely so you can make them ahead of time for a specific project or keep some on hand to grab any time. Royal icing transfers fit perfectly with my design style of "keep it simple".
NOTE: * Always make extra transfers! They are fragile so can easily break. The more narrow the transfer, the more fragile. They can break while removing from the sheet protectors. They can break while handling during decorating. Oh, and sometimes you might drop one onto a flooded cookie and it lands upside down so you need to fish it out and drop on a new one! Watch and plan for all that! * Be careful of color bleed. Use care when your transfer and base are two extremes of light and dark, for ex: white transfer onto black base or black transfer onto white base. Use as little food coloring as possible when making dark icing. Remember that it will darken as it develops and dries. You might want to use the "glue" method when bleeding is a concern. Bleeding is more likely to happen when dropping the transfers onto a wet base. * Make sure the transfers are 100% dry before storing. Overnight is usually fine. If you live in a humid climate, allow more dry time. Using too much food coloring and over-mixing your royal icing can cause drying issues. If you've made either of those two mistakes, your transfers may never fully dry. They'll be difficult to remove but if you can, they're still usable. I wouldn't store transfers that haven't dried for future use though. * Use care when piping multi-sectional designs with small protrusions. For example, the bee with wings. Check out my tutorial here with my #1 most important tip to make your transfers sturdier! Watch the video below. Notice how I piped the wings first, bringing them down into the body area? Had I piped the body first, then the wings above - those wings could have easily snapped off. Same goes for the pumpkin transfers - Notice how I swiped the stems INTO the center of the pumpkins.
Watch a few videos to see how to make the transfers and add them onto cookies.
Royal Icing Transfers are not just for cookies! They make fabulous decorations for cupcakes and cakes. Imagine carrots for carrot cake and lemons on lemon chiffon! Decorate birthday cakes with balloon and number transfers! The possibilities are endless! Let's not forget about buttercream. You can absolutely use the transfer sheets with buttercream. Pipe your designs. Put them into the freezer. Peel them off and apply to your cake or cupcake.
|


 RSS Feed